Pages

Monday, May 13, 2019

转:论文写作利器 LaTex 系列之推荐套装

From: http://www.huangpan.net/?p=1756

软件安装和配置

依次安装如下软件并进行配置,其中

TeX Live(必装)

TeX Live 是由国际 TeX 用户组织 TUG 开发的 TeX 系统,支持不同的操作系统平台。这也是本方案的核心,配置所有的编译环境和各种宏包,还附带了一个编辑器(不是很好用)。

下载

由于 TeX Live 2019 常规安装需要一边下载一边安装,速度较慢,所以博主推荐直接下载 ISO 文件,可一次性获取完整的安装文件,可以使安装过程更为顺畅。放上清华大学的镜像,点击链接下载。

安装

  1. 下载的文件是 ISO 光盘镜像文件,用虚拟光驱挂载或者直接用解压工具打开即可。
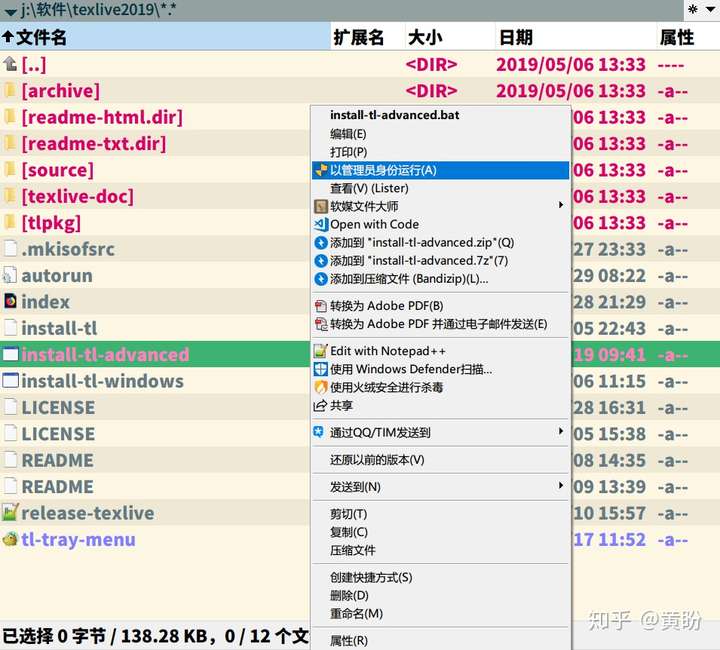
  2. 在解压出来的主目录中找到 install-tl-advanced.bat 文件,右击并以管理员身份运行。注意:文件夹路径里面不能有中文,不然打不开。


  1. 选择安装目录。注意:安装后将会占用5G左右的磁盘空间,建议将安装目录切换到D盘或者其他空间较大的盘中。
  2. 其他默认即可。

VSCode(必装)

VSCode 全称 Visual Studio Code,是微软出的一款轻量级代码编辑器,免费、开源而且功能强大。它支持几乎所有主流的程序语言的语法高亮、智能代码补全、自定义热键、括号匹配、代码片段、代码对比 Diff、GIT 等特性,支持插件扩展,并针对网页开发和云端应用开发做了优化。软件跨平台支持 Win、Mac 以及 Linux。 更多关于 VSCode 的介绍,请点击链接查看本站文章。

下载

下载链接。

安装

查看本站安装教程。

LaTex Workshop(必装)

LaTex Workshop 是 VSCode 的插件,这个插件为 VS Code 提供了 LaTeX 语言支持。

下载安装

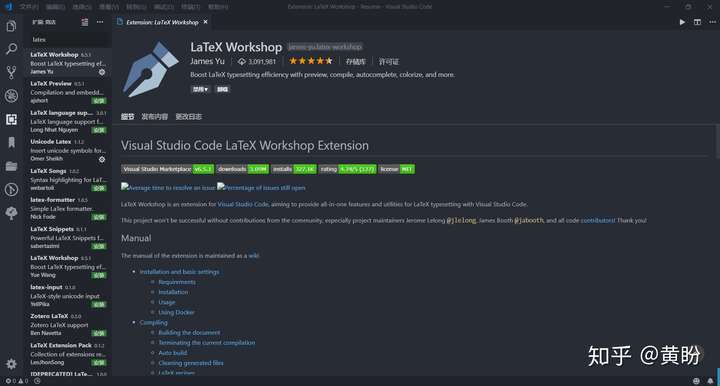
在 VSCode 的扩展管理中,搜索 latex,第一个结果就是我们要安装的插件。


基本配置

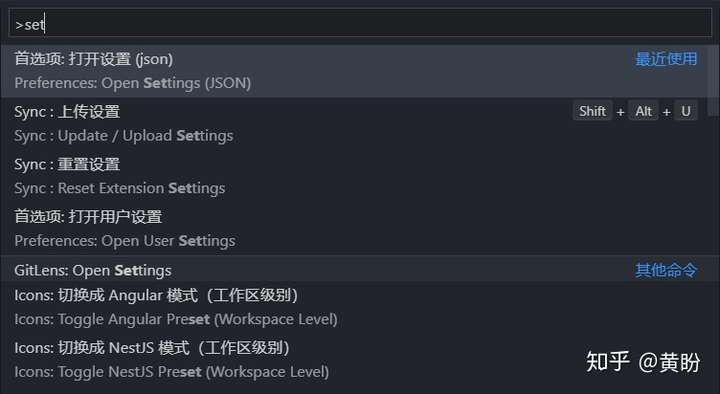
在 VSCode 里面按住快捷键,CTRL+SHIFT+P,然后输入 set,用 ENTER 选择第一个。

然后将下面的代码复制粘贴到你的 setting.json 文件最外面移对花括号里。
"latex-workshop.latex.recipes": [{
        "name": "xelatex",
        "tools": [
            "xelatex"
        ]
    },
    {
        "name": "xelatex ->bibtex -> xelatex*2",
        "tools": [
            "xelatex",
            "bibtex",
            "xelatex",
            "xelatex"
        ]
    },
    {
        "name": "pdflatex",
        "tools": [
            "pdflatex"
        ]
    }
],
"latex-workshop.latex.tools": [{
        "name": "xelatex",
        "command": "xelatex",
        "args": [
            "-synctex=1",
            "-interaction=nonstopmode",
            "-file-line-error",
            "%DOC%"
        ]
    },
    {
        "name": "pdflatex",
        "command": "pdflatex",
        "args": [
            "-synctex=1",
            "-interaction=nonstopmode",
            "-file-line-error",
            "%DOC%"
        ]
    },
    {
        "name": "bibtex",
        "command": "bibtex",
        "args": [
            "%DOCFILE%"
        ]
    }
],
现在就可以用 VSCode 编辑 LaTex 文档并编译出 PDF 文件了,按 CTRL+ALT+B 编译,然后按 CTRL+ALT+V 打开 PDF 文件。

还有一些小细节

为了使用过程更舒服,博主还建议修改两个参数:
"latex-workshop.latex.autoClean.run": "onBuilt",
"latex-workshop.latex.autoBuild.run": "never",
]
由于 LaTex 编译过程会产生一些辅助文件,放在那没什么用,看着也糟心,所以第一个参数是指定在PDF文件生成后自动清除辅助文件。第二个参数是指保存是否自动编译 LaTex 文件,因为 VSCode 有自动保存功能,所以每次自动保存都会编译 LaTex 文件,这样就会导致电脑每隔一段时间就会自动编译文档,没有必要。

Sumatra PDF(推荐)

Sumatra Pdf 是一款轻量级的 PDF 阅读器,类型为开放软件,并且有安装版和便携版两个版本。 VSCode 内置的 PDF 查看器功能比较简单,而且不太方便,而 Adobe Reader 则相对体积大,打开速度慢。Sumatra PDF 小巧强大,启动速度快,作为本方案的 PDF 阅读器最合适不过,而且还可以和源码之间实现定位跳转,弥补 LaTex “所见非所得”的劣势。

下载安装

基本配置

要使用 Sumatra PDF 预览编译好的PDF文件,将下列代码复制粘贴至 setting.json 配置文件内。
"latex-workshop.view.pdf.viewer": "external",
"latex-workshop.view.pdf.external.command": {
    "command": "C:/Programs/SumatraPDF/SumatraPDF.exe",  //SumatraPDF.exe的实际路径
    "args": [
        "%PDF%"
    ]
},

配置正向搜索(LaTex->PDF)

"latex-workshop.view.pdf.external.synctex": {
    "command": "C:/Programs/SumatraPDF/SumatraPDF.exe",  //SumatraPDF.exe的实际路径
    "args": [
        "-forward-search",
        "%TEX%",
        "%LINE%",
        "%PDF%"
    ]
},
右键文件空白处,单击 SyncTeX from cursor 或者 CTRl+-> 即可正向搜索。

配置反向搜索(PDF->LaTex)

打开 Sumatra PDF,进入设置->选项对话框,在“设置反向搜索命令行”处填入如下内容:
"C:\Program Files\Microsoft VS Code\Code.exe"  -g "%f:%l" %Code.exe的实际路径%
双击 PDF 中的任意一处即可跳转到 VSCode 中所对应的内容的源代码处。注意:由于从 VSCode 调用 Sumatra PDF 时是作为子进程的,为避免反向搜索失败,最好是先独立的运行SumatraPDF.exe后再进行正反向搜索。

Git(推荐)

Git 是用于 Linux 内核开发的版本控制工具。经常写论文的人都知道,一篇论文需要修改很多遍才能满意,这个过程中就有许多论文版本,比如初稿,终稿,最终版,打死也不改最终版等等版本,版本一多,就需要管理了,不然太乱了。有的时候可能觉得最终版就是最后要交的版本了,可老师突然说上一个版本更好一点,可上一个版本你都删了,或者你也不知道上一个版本是哪一个了,这就很尴尬了。所以写论文时,一个好的版本控制工具就尤为重要了。

下载安装

官网下载链接。

基本教程

博主准备后面再写一篇关于 Git 的文章,先放上我的入门教程,廖雪峰老师的文章,点击查看。

VSCode 插件

VSCode 自带了终端,所以可以直接在终端里用命令进行 Git 操作。不过刚开始可能不习惯,需要一些图形按钮进行辅助,而且这些插件还加强了 Git 的操作,还是很有必要安装的。
  • GitLens
  • Git History

其他配置

latex-formatter

这是一款 VSCode 的 LaTex 代码格式化插件,虽然 LaTex 最终显示效果和源码的排版没关系,但排版美观的 LaTex 源码可以让人更加沉浸在写作中,并且清晰的排版可以让初学者更容易找到源码中的错误。它的效果如下:
\chapter{balabalabala}
    \section{balabalabala}
        \subsection{balabalabala}
            \par balabalabala
        \subsection{balabalabala}
            \par balabalabala
    \section{balabalabala}
        \subsection{balabalabala}
            \par balabalabala
上面的缩进使我们一眼就可以看出他们之间的等级关系。

LaTex 辅助软件

挖一个坑,下篇文章再讲。

验证配置是否成功

新建一个文件夹(文件夹名字和文件夹的路径里面不能有中文),在文件夹里面新建一个 test.tex 文件。依次,文件夹上右键 -> open with Code,将下列代码复制粘贴进 test.tex 中。
%!Tex Program = xelatex
\documentclass{article}
\usepackage{zhfontcfg}
\begin{document}
\title{My \LaTeX{}}
\author{黄盼}
\maketitle
%\today
\par{配置成功。}
\end{document}
先单独启动 Sumatra PDF 阅读器,再按 CTRL+ALT+B,编译完后,再按 CRTL+ALT+V,调用 Sumatra PDF 阅读器查看编译好的 PDF 文件。在 PDF 适当位置双击,即可跳转至 VSCode 中的 LaTex 源码,在源码处,右键,单击 SyncTeX from cursor 即可查看对应 PDF 所对应位置。

Tuesday, April 2, 2019

Raspbian, Thunar, browse network, samba share

Required package:

gvfs-backends, gvfs-common, gvfs-fuse, gvfs and gvfs-smb etc.

Friday, March 29, 2019

Auto Mount an NTFS USB Drive on Raspberry Pi

From: https://techwiztime.com/guide/auto-mount-ntfs-usb-drive-raspberry-pi/

Auto mounting an NTFS USB Hard Drive on a Raspberry Pi isn’t that difficult when you know how. In this guide, I’ll be using Raspbian Stretch Lite through the command line interface, but you could do this via the terminal in Raspbian Stretch desktop as well.
Let’s get started!

Hardware List

Software List

From the Command Line, we need to first make sure Raspbian is completely up to date and install the neccesary package to make NTFS work which is called NTFS-3G. Once that’s done, we will do a quick reboot to make sure everything sticks in place.
sudo apt update
sudo apt upgrade
sudo apt install ntfs-3g -y
reboot

Next we need to create a directory on the Raspberry Pi that will act as the mount point for the USB Hard Drive. To keep it organised, we will create this in the directory mnt and we will call the folder usbhdd to keep it simple.
sudo mkdir /mnt/usbhdd
Now that we have the folder ready, we need to figure out what the hard drive partition is that we want to mount. To do this, we need to check out fdisk and see which partition is the one we want to mount. It should be the last in the long list. This could be sda2, sda1 or even sdb2 so look at the size and whichever is bigger should be the correct one. Mine shows 1.8T as the biggest partion so I know that sda1 is the one that I want.
sudo fdisk -l
Now we know our device partition, we need to get what is know as the Partition ID. This will let us mount the USB Hard Drive even if the device changes from sda1 to say sdb1. It has happened to me before and caused my whole Raspberry Pi to fail at boot up so this step is important. You should see a section called PARTUUID=”000xxxxx-00″ on the device line. My particular one was 770bcbdc-01 and that’s what you would need to write down.
sudo blkid
With our Partition ID, we can now add some information to the FSTAB so our drive will automatically boot each time, but first we want to figure out the ID of our current logged in user. This will be important I promise. It will probably be uid=1000 and gid=1000. We need to take note of both the uid and the gid numbers.
id
FSTAB is our next step. Here we need to add the information we have gathered so far and before we reboot, we are going to test that it worked so we don’t cause the raspberry pi to fail at boot up. So the following string needs to be inserted on a new line under the exisiting ones, replacing the following with your details. PARTUUID, Mount Point, GID and UID.
This opens the FSTAB so we can edit it with the auto mounting information.
sudo nano /etc/fstab
This is the code you need to put into the file. Once you are done, press Control X then Y then ENTER to save the file.
PARTUUID=770bcbdc-01 /mnt/usbhdd ntfs auto,exec,rw,user,dmask=002,fmask=113,uid=1000,gid=1000 0 0
Broken down a little, here’s what that all means
file system - PARTUUID=770bcbdc-01 - This is the partition id for in my case /dev/sda1
mount point - /mnt/usbhdd - This is the folder we created for mounting the USB Hard Drive
type - ntfs - This is the format the hard drive is in. It could be HFS+ for Apple, EXT4 for Linux of FAT32 for DOS
options - auto,exec,rw,user,dmask=002,fmask=113,uid=1000,gid=1000 - Long Story short, this gives all the permissions
dump - 0 - This means we don't want to create a dump
pass - 0 - This means we don't want to do a file system check everytime

With the file now saved, we need to check that there’s no errors in the file before we reboot. To do that, we need to try and mount the partition from the FSTAB file.
sudo mount -a
If no errors come up, then we can check that the device is mounted correctly
sudo df -h
If you see your device in the list, then we are safe to do a reboot of the Raspberry Pi.
reboot
Once we are rebooted, log in to the raspberry pi and check you USB Hard Drive has mounted by going to that folder.
cd /mnt/usbhdd
And then we can check what’s in the folder by listing it’s contents
ls -la
And that’s it ladies and gentlemen. You should now have your Raspberry Pi setup to auto mount an NTFS formatted USB Hard Drive every time it reboots. Leave a comment down below if you have a problem and someone here or in the community should be able to help.

Monday, January 28, 2019

Linux Mint, Touchpad Sensitivity

From: https://forums.linuxmint.com/viewtopic.php?t=145283

The property "Synaptics Finger" can affect the touchpad sensitivity. If you look at your values:
Synaptics Finger (278): 12, 15, 128

The 278 is the id # of the property and the three numbers after it are the values for FingerLow, FingerHigh, and FingerPress. 
You can read about these properties in the link below:
http://www.x.org/archive/X11R7.5/doc/man/man4/synaptics.4.html

FingerHigh must always be higher than FingerLow. Start by increasing the values of FingerLow and FingerHigh two points at a 
time with this command:
xinput --set-prop "AlpsPS/2 ALPS DualPoint TouchPad" 278 14 17 128

Sometimes using the name of the touchpad doesn't work in the command, so the id # number you previously obtained must be used, 
substituting it for the X below:
xinput --set-prop X 278 14 17 128

The command should go into effect immediately, so you can test the touchpad.
Then try: xinput --set-prop X 278 16 19 128
and continue increasing the values of FingerLow and FingerHigh until the problem is resolved, but once you get to around 35 to 40, then 
going any highter probably won't help. For a Synaptics touchpad you may be able to go higher. If you go too high then some other
function of the toughpad may not work. Any changes made will only last for one session but right now we're just trying to see if this method
works.


To make the changes permanent, first open the file "50-synaptics.conf" with this command in the Terminal: 
gksudo gedit /usr/share/X11/xorg.conf.d/50-synaptics.conf
* file name may changes

Add the following two lines to the first section named: Section "InputClass" 
Replace the "Y" and "Z" in the lines with the values you got from testing:
Option "FingerLow" "Y" 
Option "FingerHigh" "Z" 


Save the file.

Thursday, July 19, 2018

OpenVPN on linux (PIA)

From: https://www.privateinternetaccess.com/archive/forum/discussion/18003/openvpn-step-by-step-setups-for-various-debian-based-linux-oss-with-videos-ubuntu-mint-debian

Install network-manager-openvpn and its dependencies
=============================================
    sudo apt-get install network-manager-openvpn network-manager network-manager-gnome network-manager-openvpn-gnome
    - then press [enter]

*{For Debian and Kali only}
    Enabling Interface Management
    sudo nano /etc/NetworkManager/NetworkManager.conf
    - then press [enter]
        - edit the line "managed=false" to be...
            "managed=true"
        - Save the file and exit by...
            - Press "Ctrl+x"
            - then press "y"
            - then press the [Enter] key

Reboot the computer now!


* After rebooting the computer continue with the following steps...

   
Make a directory and download the crt and pem files
=============================================
In Terminal - Make a directory to store the setup files
    mkdir ~/OpenVPN-setup-PIA
    - then press [enter]

Move into that directory
    cd ~/OpenVPN-setup-PIA
    - then press [enter]

Download the openvpn.zip from privateinternetaccess.com with...
    wget http://www.privateinternetaccess.com/openvpn/openvpn.zip
    - then press [enter]

Extract the files from the zip with...
    unzip openvpn.zip
    - then press [enter]

You can now exit the terminal with...
    exit
    - then press [enter]
  
Import the PIA OpenVPN config file
=============================================
- Right click the Network Manager on the menu bar
    - and click "Edit Connections..."
    - then click "Add"
    - choose "Import a saved VPN configuration..." for the connection type from the drop down menu
    - then click "Create..."
    - double click to go into "OpenVPN-setup-PIA" folder
    - choose which server you would like to setup and connect to
    - then click "Open"
    - Remove only the ":1198" from the "Gateway:" ( if present ) as only the domain name should be in this box
    - for the "User name:" type in your "p1234567" username
    - for the "Password:" type in the password that goes with your "p-xxxxx" username
    - Then click "Advanced..."
    - Check "Use custom gateway port:" and set it to "1198"
    - Click on the "Security" tab
    - Set the "Cipher:" to "AES-128-CBC"
    - Set the "HMAC Authentication:" to "SHA-1"
    - Click "OK"
    - Click "Save"
Reboot the computer now! (optional but recommended )

Now connect to the VPN
=============================================
- Now Left click the Network Manager on the menu bar
    - click "VPN Connections"
    - click Ex. "Mexico" {This will be the name of the server you chose to setup}
    - wait for it to connect
  
- Test by opening your Internet browser and going to...
    https://www.privateinternetaccess.com/pages/whats-my-ip/
    https://ipleak.net/
  
Enjoy!

Friday, May 18, 2018

Running Jupyter Notebooks on a Remote Server via SSH

From: https://techtalktone.wordpress.com/2017/03/28/running-jupyter-notebooks-on-a-remote-server-via-ssh/

Step 1: On your Remote Computer

SSH into your remote server/machine. Open a Jupyter Notebook using the no-browser option (since we don’t need the browser just yet) on the Terminal.
sasha@remote $ jupyter notebook --no-browser --port=8887
I’ve changed the port to 8887 just to make it easier to explain the next step.
Jupyter generally returns to you a token with the URL for your browser for the first time you login to it. If you get one, store this somewhere for later.

Step 2: On your Local Computer

Start an SSH Tunnel, and connect it to the Jupyter notebook you just started on the server.
ssh -N -L localhost:8888:localhost:8887 sasha@remote
-L binds the local_address:port1 to a remote_address:port2. To be specific, it specifies that the connections for the socket on the local host are to be forwarded to the remote host. The socket then listens to the specified bind address.
-N specifies not to execute a remote command. This is useful when forwarding ports.
On your local computer, navigate to localhost:8888. The browser will probably ask you for a token. Put the token the Remote Computer returned to you in the earlier step.

To close the SSH tunnel 

on the local machine, 
look for the process and kill it manually:
local_user@local_host$ ps aux | grep localhost:8889
local_user 18418  0.0  0.0  41488   684 ?        Ss   17:27   0:00 ssh -N -f -L localhost:8888:localhost:8889 remote_user@remote_host
local_user 18424  0.0  0.0  11572   932 pts/6    S+   17:27   0:00 grep localhost:8889

local_user@local_host$ kill -15 18418
Alternatively, you can start the tunnel without the -f option. The process will then remain in the foreground and can be killed with ctrl-c.
On the remote machine, kill the IPython server with ctrl-c ctrl-c.

Friday, February 10, 2017

视频文件的版本

转: http://tieba.baidu.com/p/3603067137
 
 
1.CAM(枪版)——珍爱生命,远离枪版


CAM通常是用数码摄像机从电影院盗录。有时会使用小三角架,但大多数时候不可能使用,所以摄像机会抖动。因此我们看到画面通常偏暗人物常常会失真,下方的字幕时常会出现倾斜。 由于声音是从摄像机自带的话筒录制,所以经常会录到观众的笑声等声音。因为这些因素,图象和声音质量通常都很差。


举例说明:Journey.To.The.Center.Of.The.Earth.CAM.XViD-CAMERA(地心游记3D枪版)


2.TS——只比枪版好一点


TS与CAM版的标准是相同的。 但它使用的是外置音源(一般是影院座椅上为听力不好的人设的耳机孔)这个音源不能保证是好的音源,因为受到很多背景噪音的干扰。TS是在空的影院或是用专业摄像机在投影室录制,所以图象质量可能比CAM好。但画面的起伏很大。常出现的有一般TS版和经过修复清晰TS版。


举例说明:Iron.Man.PROPER.TS.XviD-iLG(钢铁侠TS版)


3.TC——基本也可以忽略


TC使用电视电影机从胶片直接数字拷贝。画面质量还不错,但亮度不足,有些昏暗。很多时候制作TC使用的音源来自TS,因此音质很差,但画面质量远好过TS。如果不是太讲究的话TC版还是不错的选择。


举例说明:Madagascar.2005.TC.XviD.AC3.avi(马达加斯加TC版)


4.DVDSCR——最差也要看这个


预览版的或者是测试版的DVD,非正式出版的版本。从预览版 DVD 中获取,通过mpeg-4技术进行高质量压缩的视频格式。能比DVDRip早发布,但画质稍差。(经常有一些不在黑边里在屏幕下方滚动的消息,包含版权和反盗版电话号码 ,会影响观看。)如果没有严格的划分它的画质应与TC版差不多。


举例说明:Quantum.of.Solace.REPACK.DVDSCR.XviD-COALiTiON.avi(007大破量子危机DVDSCR版)


5.DVDRIP——比较理想的版本


DVDRIP是从最终版的DVD转制。质量应该是最好的。将DVD的视频、音频、字幕剥离出来,再经过压缩或者其他处理,然后重新合成成多媒体文件。一般来说,DVDrip由影音文件(后缀为avi)和字幕文件组成。


举例说明:Pineapple.Express.2008.DVDRip.XviD-ARROW.avi(菠萝快车DVDRip版)


6.HR-HDTV——不错的选择


HR-HDTV是用DivX/XviD/x264等MPEG4压缩技术对HDTV的视频图像进行高质量压缩,然后将视频、音频部分封装成一个.avi或.mkv文件,最后再加上外挂的字幕文件而形成的视频格式。 画面清晰度更高。


7.HDRIP——BD之下,万人之上


HDRIP=HD-DVD Rip,即HD-DVD高清转制,效果好于一般的高清转制。


举例说明:Stardust.2007.HDRip.x264.a720.AC3-C@SiLU.mkv(星尘HDrip版)


8.BDRIP——高清之下,普通清晰度的王者


BDrip = Blue-ray Disc Rip,即蓝光高清转制,效果比HDRIP还要好。


举例说明:Awake.2007.BDRip.X264-TLF.mkv(夺命手术BDrip版)


9.R5——心急的您可以看这个


R5一般大都是俄罗斯5区版,由于北美大片在俄罗斯发行的语种经常配音为俄罗斯语,因此网络上会出现采用R5的视频+枪版TS的英语原声音频=合成版本(所以音效差),当然,也经常有未配音过音效好的R5,遇到合成版本,在发布时会特别注明音效。


举例说明:Get.Smart.R5.LINE.XViD-mVs.avi(糊涂侦探R5版)


10.AVI——廉颇老矣


AVI英文全称为Audio Video Interleaved,即音频视频交错格式。是将语音和影像同步组合在一起的文件格式。它对视频文件采用了一种有损压缩方式,但压缩比较高,因此尽管面面质量不是太好,但其应用范围仍然非常广泛。(就目前来看,随着观众对电影品质要求的提升,AVI格式越来越力不从心了)


举例说明:Breaking.News.2004.DVDRip.XViD-TLF.avi(大事件avi格式版本)


11.MKV——后起之秀


一种后缀为MKV的视频文件频频出现在网络上,它可在一个文件中集成多条不同类型的音轨和字幕轨,而且其视频编码的自由度也非常大,可以是常见的DivX、XviD、3IVX,甚至可以是RealVideo、QuickTime、WMV这类流式视频。实际上,它是一种全称为Matroska的新型多媒体封装格式,这种先进的、开放的封装格式已经给我们展示非常好的应用前景,甚至有人把它看成是AVI的替代者!


举例说明:Children.Of.Man.2006.BDRE.1080p.x264.AC3-SiLUHD.mkv(人类之子MKV封装版本)


12.MOV——高清预告片首选


MOV即QuickTime影片格式,它是Apple公司开发的一种音频、视频文件格式,用于存储常用数字媒体类型,如音频和视频。当选择 QuickTime (*.mov)作为“保存类型”时,动画将保存为 .mov 文件。


现在MOV格式常常被用来制作高清电影预告片,可以达到1080P的所谓全高清标准。


举例说明:terminatorsalvation-tlr1_h1080p.mov(终结者4高清预告片)


13.XviD——常见标准


最常用的MPEG-4视频压缩编码格式,我们下载的很多电影基于这种编码。


举例说明:Connected.2008.DVDRip.XviD-BiEN.avi(保持通话,xvid编码)


14.X264——业界先锋


x264是一种免费的、具有更优秀算法的H.264/MPEG-4 AVC视频压缩编码格式。它同xvid一样都是开源项目,但x264是采用H.264标准的,而xvid是采用MPEG-4早期标准的。由于H.264是2003年正式发布的最新的视频编码标准,因此,在通常情况下,x264压缩出的视频文件在相同质量下要比xvid压缩出的文件要小,或者也可以说,在相同体积下比xvid压缩出的文件质量要好。


举例说明:WALL.E.2008.BDRip.X264-TLF.mkv(机器人总动员,X264编码)


15.IMAX——所谓巨幕


有的电影会标注“IMAX”版本。那什么是IMAX呢?


IMAX(即Image Maximum的缩写,意为“最大影像”,汉语发音可读作“艾麦克斯”)是一种能够放映比传统胶片更大和更高解像度的电影放映系统。整套系统包括以IMAX规格摄制的影片拷贝、放映机、音响系统、银幕等。标准的IMAX银幕为22米宽、16米高,但完全可以在更大的银幕播放,而且迄今为止不断有更大的IMAX银幕出现。 今年的《功夫熊猫》就同时具有普通和IMAX两种版本。


举例说明:The.Dark.Knight.2008.IMAX.BDRip.X264-TLF.mkv(蝙蝠侠黑暗骑士IMAX版本)


16.MP4——比较尴尬


有的电影是MP4格式的,这代表着它采用了MPEG-4视频压缩编码,但是具体是哪一种编码格式并不确定,一般来说是DIVX或者XVID。总之感觉是个很鸡肋的格式,一般是用在掌上便携设备上,电脑用户不推荐。


举例说明:Friends.S01E01.The.One.Where.Monica.Gets.A.New.Roommate.iPod-mp4.chs-en.mp4(老友记第一季第一集,ipd专用版本,mp4格式)


17.TS——此TS非彼TS


这个TS代表的是文件后缀名为.TS的高清格式。这种格式的优点在于对硬件的要求不高,即使是1080P的电影这两年的家用电脑都可以轻松播放,不过缺点同样明显——超大的文件体积,动辄三四十个G。


举例说明:Silent.Hill.Blu-ray.REMUX.MPEG2.1080P.LPCM.DTS.Orbitlee@Silu.ts(寂静岭TS版,9碟,完全大小37.9G,单碟4.3G)


18.PROPER——竞争的结果


根据发布规则,最先发布Telesync (TS)的组织赢得(TS发布的)比赛。但是,如果这个发布版本质量很差,同时另一组织有另一TS版本(或质量更好的同一片源),那么标记PROPER被加到目录上以避免重复。PROPER是一个最主观的标记,很多人会争论是否PROPER比原始发布版本好。很多发布组织只不过因为输掉了发布比赛而发布PROPER。发布PROPER的原因应该总是包含在NFO文件里。


举例说明:Pirates.Of.The.Caribbean.At.Worlds.End.PROPER.DVDRip.XviD-HooKah-CD1.avi(加勒比海盗3世界尽头proper版本)


19.Director's Cut——导演剪辑版


导演剪辑版,主要用于碟片发行中,因为出于商业的、票房的原因,在影院上映的影片未必是导演最终剪辑后的版本。故而碟商们推出了所谓导演剪辑版,与影院版有所区别,也是为了满足一部分追求“原汁原味”的观众的要求,同时多了一条生财之道。导演剪辑版与影院版,有的差别较大(无论是放映时间还是镜头),有的则差别不大,因人因片而异。至于艺术成就,更是很难笼统而言。因为有人看重导演的主动权,但导演剪辑版也可能不如影院版更精炼,见仁见智而已。


举例说明:Saw.Director's.Cut.HD.DVD.REMUX.VC1.1080p.DTS-HD.Silu.ts(电锯惊魂导演剪辑版)


20.Unrated——未分级版


也就是没有根据不同观众对象剪辑,比较完整、原始的版本。(俗称未剪版)。指的是没有在MPAA(美国电影协会)审查的电影。现在指的是一般的电影的最初为剪辑版本。一般包括大量暴力色情粗口的。是导演最初剪出来的片子。经MPAA审了片子之后就会定级。诸如。R、NC-17、PG13、PG、G (越往后越合家欢)等。


举例说明:American.Psycho.Unrated.Version.2000.DVDrip.XviD.AC3.iNT.avi(美国狂魔未分级版)


21.LIMITED


LIMITED电影指该电影只在有限的电影院放映,通常少于250家。通常较小的电影(比如艺术电影)的发行是LIMETED。


举例说明:Eternal.2004.LiMiTED.DVDrip.XviD-ShysteR.avi(邪恶的永生limited版)


22.TVRIP——TV转制


所谓TVRip是从电视(最好是从数码有线电视/卫星电视捕捉)转制的电视剧及接收卫星接收到的节目,然后通过电视卡进行捕捉,压缩成文件,我们看的很多综艺及体育节目都是TVRip。有些电视剧也会使用TVRip的方式进行发布。


23.720P


720P是美国电影电视工程师协会(SMPTE)制定的最高等级高清数字电视的格式标准,有效显示格式为:1280×720.SMPTE(美国电影电视工程协会)将数字高清信号数字电视扫描线的不同分为1080P、1080I、720P(i是interlace,隔行的意思,p是Progressive,逐行的意思)。720P是一种在逐行扫描下达到1280×720的分辨率的显示格式。是数字电影成像技术和计算机技术的融合。这是高清视频的最低标准。


举例说明:Le.Fabuleux.Destin.d'Amlie.Poulain.2001.Blu-ray.720p.x264.DD51-HiS@SiLUHD.mkv(天使爱美丽720P)


24.1080I


即1080线隔行扫描,分辨率为1920×1080,仅次于1080P


举例说明:close.encounters.of.the.third.kind.1080i.disk1.ts(第三类接触1080i版本)


25.1080P


1080P是美国电影电视工程师协会(SMPTE)制定的最高等级高清数字电视的格式标准,有效显示格式为:1920×1080,像素数达到207.36万。


1080P带来的高画质给消费者带来的是真正的家庭影院的视听享受,由于它向下全面兼容其它高清格式,通用性非常强,保证了在未来十几年的时间里产品不会过时,具有很好的超前性。随着1080P片源的不断涌现,1080P产品的优势已经显现出来。


举例说明:Resident.Evil.HD.DVD.REMUX.1080p.MPEG-2.DTS-HD.F@Silu.disk1.ts(生化危机1,1080P版本)


26.REPACK——重新打包版


如果发布组织发布了一个坏的版本,他们会发布REPACK来解决这些问题。


举例说明:The.Eye.2008.REPACK.BDRip.X264-TLF-cd1.mkv(美版见鬼,repack版本)


27.REMUX——无损版


Remux的意思是无损的提取出HD-DVD 和 BluRay-DVD里面的视频数据和音频数据,封装到我们熟悉的TS或者AVI文件中。


HD-DVD和 Blu-Ray Rip、Re都是把原始的高清数据进行压缩和重编码,从1080P压缩到720P, 20G左右的片子压缩到了4.3G. 可在19、20、22寸的宽屏上看,但是上到大尺寸高分辩率的显示设备就能明显的看出区别了。大屏幕的朋友还是建议购买原始编码的Remux。


举例说明:The.Patriot.Extended.Cut.Blu-ray.REMUX.H264.1080P.DTS.LPCM.DD51.Fanxy@Silu.DISK1.ts(爱国者remux版本)


28. Extended——加长版


情形和导演剪辑版类似,很多的加长版是用来圈钱的,有的干脆就是把花絮里的删除段落直接加进去,也就长了几分钟而已。也有很厚道的,比如指环王的加长版,一部就加长了近50分钟,肯定对剧情有影响的。


举例说明:The.Lord.Of.The.Rings-Return.Of.The.King.EXTENDED.EDITION.DVDRip.XViD-ALLiANCE.avi(指环王3:王者归来加长版)


29.AC3


常见的电影音频格式。


举例说明:Crank.2006.DVDRip.XviD.AC3-lsqh2002.avi(怒火攻心,音频格式AC3)


30.DD5.1——杜比5.1声道


5.1声道就是使用5个喇叭和1个超低音扬声器来达到一种身临其境感觉的音乐播放方式,由杜比公司开发。一般来讲,只有高清视频才采用这种音轨。