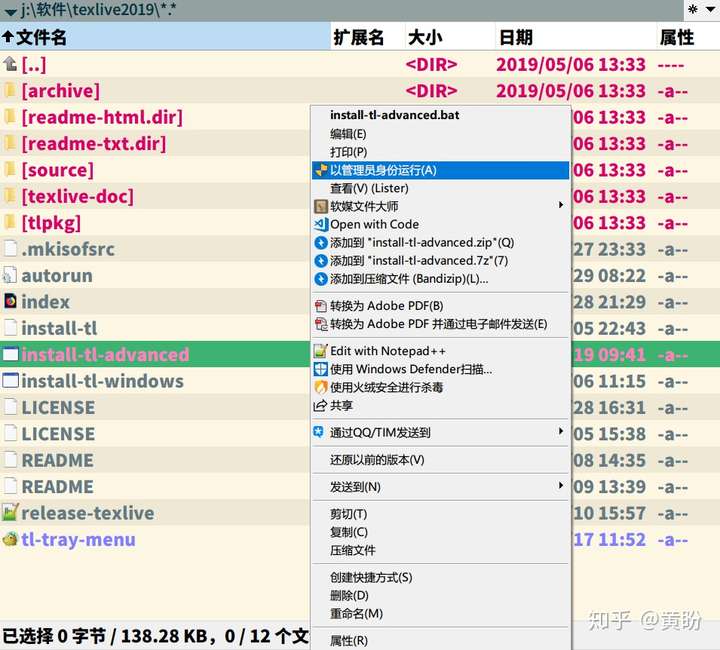
Sumatra
Pdf 是一款轻量级的 PDF 阅读器,类型为开放软件,并且有安装版和便携版两个版本。 VSCode 内置的 PDF
查看器功能比较简单,而且不太方便,而 Adobe Reader 则相对体积大,打开速度慢。Sumatra PDF
小巧强大,启动速度快,作为本方案的 PDF 阅读器最合适不过,而且还可以和源码之间实现定位跳转,弥补 LaTex “所见非所得”的劣势。
"C:\Program Files\Microsoft VS Code\Code.exe" -g "%f:%l" %Code.exe的实际路径%
双击 PDF 中的任意一处即可跳转到 VSCode 中所对应的内容的源代码处。注意:由于从 VSCode 调用 Sumatra PDF 时是作为子进程的,为避免反向搜索失败,最好是先独立的运行SumatraPDF.exe后再进行正反向搜索。
Git(推荐)
Git
是用于 Linux
内核开发的版本控制工具。经常写论文的人都知道,一篇论文需要修改很多遍才能满意,这个过程中就有许多论文版本,比如初稿,终稿,最终版,打死也不改最终版等等版本,版本一多,就需要管理了,不然太乱了。有的时候可能觉得最终版就是最后要交的版本了,可老师突然说上一个版本更好一点,可上一个版本你都删了,或者你也不知道上一个版本是哪一个了,这就很尴尬了。所以写论文时,一个好的版本控制工具就尤为重要了。
先单独启动 Sumatra PDF 阅读器,再按 CTRL+ALT+B,编译完后,再按 CRTL+ALT+V,调用 Sumatra PDF 阅读器查看编译好的 PDF 文件。在 PDF 适当位置双击,即可跳转至 VSCode 中的 LaTex 源码,在源码处,右键,单击 SyncTeX from cursor 即可查看对应 PDF 所对应位置。
Auto mounting an NTFS USB Hard Drive on a Raspberry Pi isn’t that
difficult when you know how. In this guide, I’ll be using Raspbian
Stretch Lite through the command line interface, but you could do this
via the terminal in Raspbian Stretch desktop as well.
Let’s get started!
From
the Command Line, we need to first make sure Raspbian is completely up
to date and install the neccesary package to make NTFS work which is
called NTFS-3G. Once that’s done, we will do a quick reboot to make sure
everything sticks in place. sudo apt update
sudo apt upgrade
sudo apt install ntfs-3g -y
reboot
Next we need to create a directory on the Raspberry
Pi that will act as the mount point for the USB Hard Drive. To keep it
organised, we will create this in the directory mnt and we will call the folder usbhdd to keep it simple. sudo mkdir /mnt/usbhdd
Now
that we have the folder ready, we need to figure out what the hard
drive partition is that we want to mount. To do this, we need to check
out fdisk and see which partition is the one we want to mount. It should
be the last in the long list. This could be sda2, sda1 or even sdb2 so
look at the size and whichever is bigger should be the correct one. Mine
shows 1.8T as the biggest partion so I know that sda1 is the one that I
want. sudo fdisk -l
Now we know our device
partition, we need to get what is know as the Partition ID. This will
let us mount the USB Hard Drive even if the device changes from sda1 to
say sdb1. It has happened to me before and caused my whole Raspberry Pi
to fail at boot up so this step is important. You should see a section
called PARTUUID=”000xxxxx-00″ on the device line. My particular one was
770bcbdc-01 and that’s what you would need to write down. sudo blkid
With
our Partition ID, we can now add some information to the FSTAB so our
drive will automatically boot each time, but first we want to figure out
the ID of our current logged in user. This will be important I promise.
It will probably be uid=1000 and gid=1000. We need to take note of both
the uid and the gid numbers. id
FSTAB is our
next step. Here we need to add the information we have gathered so far
and before we reboot, we are going to test that it worked so we don’t
cause the raspberry pi to fail at boot up. So the following string needs
to be inserted on a new line under the exisiting ones, replacing the
following with your details. PARTUUID, Mount Point, GID and UID.
This opens the FSTAB so we can edit it with the auto mounting information. sudo nano /etc/fstab
This is the code you need to put into the file. Once you are done, press Control X then Y then ENTER to save the file. PARTUUID=770bcbdc-01 /mnt/usbhdd ntfs auto,exec,rw,user,dmask=002,fmask=113,uid=1000,gid=1000 0 0
Broken down a little, here’s what that all means file system - PARTUUID=770bcbdc-01 - This is the partition id for in my case /dev/sda1 mount point - /mnt/usbhdd - This is the folder we created for mounting the USB Hard Drive type - ntfs - This is the format the hard drive is in. It could be HFS+ for Apple, EXT4 for Linux of FAT32 for DOS options - auto,exec,rw,user,dmask=002,fmask=113,uid=1000,gid=1000 - Long Story short, this gives all the permissions dump - 0 - This means we don't want to create a dump pass - 0 - This means we don't want to do a file system check everytime
With
the file now saved, we need to check that there’s no errors in the file
before we reboot. To do that, we need to try and mount the partition
from the FSTAB file. sudo mount -a
If no errors come up, then we can check that the device is mounted correctly sudo df -h
If you see your device in the list, then we are safe to do a reboot of the Raspberry Pi. reboot
Once we are rebooted, log in to the raspberry pi and check you USB Hard Drive has mounted by going to that folder. cd /mnt/usbhdd
And then we can check what’s in the folder by listing it’s contents ls -la
And
that’s it ladies and gentlemen. You should now have your Raspberry Pi
setup to auto mount an NTFS formatted USB Hard Drive every time it
reboots. Leave a comment down below if you have a problem and someone
here or in the community should be able to help.
The property "Synaptics Finger" can affect the touchpad sensitivity. If you look at your values: Synaptics Finger (278): 12, 15, 128
The 278 is the id # of the property and the three numbers after it are the values for FingerLow, FingerHigh, and FingerPress. You can read about these properties in the link below: http://www.x.org/archive/X11R7.5/doc/man/man4/synaptics.4.html
FingerHigh must always be higher than FingerLow. Start by increasing the values of FingerLow and FingerHigh two points at a time with this command: xinput --set-prop "AlpsPS/2 ALPS DualPoint TouchPad" 278 14 17 128
Sometimes using the name of the touchpad doesn't work in the command, so the id # number you previously obtained must be used, substituting it for the X below: xinput --set-prop X 278 14 17 128
The command should go into effect immediately, so you can test the touchpad. Then try: xinput --set-prop X 278 16 19 128 and continue increasing the values of FingerLow and FingerHigh until the problem is resolved, but once you get to around 35 to 40, then going any highter probably won't help. For a Synaptics touchpad you may be able to go higher. If you go too high then some other function of the toughpad may not work. Any changes made will only last for one session but right now we're just trying to see if this method works. To make the changes permanent, first open the file "50-synaptics.conf" with this command in the Terminal: gksudo gedit /usr/share/X11/xorg.conf.d/50-synaptics.conf * file name may changes
Add the following two lines to the first section named: Section "InputClass" Replace the "Y" and "Z" in the lines with the values you got from testing: Option "FingerLow" "Y" Option "FingerHigh" "Z" Save the file.