Pages

Sunday, June 14, 2020

Public Samba Share Ubuntu

 From:https://websiteforstudents.com/create-public-samba-share-ubuntu-17-04-17-10/


Step 1: Install Samba

The first thing you’ll need to do is install Samba. To install it run the commands below.
sudo apt-get update
sudo apt-get install samba
The commands above install Samba and all other dependencies.

Step 2: Create the Share

First, create the folder you  want to share with the public. The folder can be anywhere but set its permission so that everyone can access it. For this this tutorial, our share will be /home/Public
Run the commands below to create the folder you wish to share.
sudo mkdir /home/Public
Then set the share permission so everyone has full access to it.
sudo chmod 0777 /home/Public
sudo chown -R nobody:nogroup /home/Public

Step 3: Configure Samba

Now that Samba is installed, you must now configure it to provide file and print services to clients. This can be done by editing its default configurations file. First create a backup of the configuration file by running the commands below.
sudo mv /etc/samba/smb.conf /etc/samba/smb.conf.bak
Next, run the commands below to open/create a new configuration file.
sudo nano /etc/samba/smb.conf
Then add the content below into the file and save. Our share will be called Public as defined in the setting below  [Public]
[global]
workgroup = WORKGROUP
server string = Samba Server %v
netbios name = ubuntu
security = user
map to guest = bad user
name resolve order = bcast host
dns proxy = no
bind interfaces only = yes

# add to the end
[Public]
   path = /home/Public
   writable = yes
   guest ok = yes
   guest only = yes
   read only = no
   create mode = 0777
   directory mode = 0777
   force user = nobody
Save the file and exit

Step 4: Restart Samba

After configuring the setting above, restart Samba by running the commands below.
sudo systemctl restart smbd

Wednesday, February 19, 2020

Activate SWAP on Asus RT-AC68U router

From: https://mydevtutorials.wordpress.com/2014/01/10/how-to-activate-swap-on-asus-rt-ac68u-router/

To enable linux SWAP on your Asus RT-AC68U router you need the following:
  • Custom firmware with jffs partition enabled (I recommend Asuswrt-Merlin build);
  • an USB HDD or USB flash drive to mount on one of your router’s USB ports.

Using a swap file

To enable swapping using a swap file you need to first create the file, prepare it for swapping and then enable the swapping on it. First of, make sure the file system the disk you wish to swap on is properly mounted. If you chose labels for the partitions, use them instead of sda1, sda2, sdb1, etc.
1
2
#check how the disk was mounted
ls -l /tmp/mnt
For the purposes of this tutorial we will assume the disk is mounted as /tmp/mnt/sda1/ and we want to use the file /tmp/mnt/sda1/myswap.swp for swapping.
1
2
3
4
5
6
7
8
9
10
11
#create a 256MB swap file ("count" is in Kilobytes)
dd if=/dev/zero of=/tmp/mnt/sda1/myswap.swp bs=1k count=262144
 
#set up the swap file
mkswap /tmp/mnt/sda1/myswap.swp
 
#enable swap
swapon /tmp/mnt/sda1/myswap.swp
 
#check if swap is on
free
If you reboot your router, the swap will be inactive until you swapon again. To do this automatically you have to create the file /jffs/scripts/post-mount, or edit it if exists and add the line (nano works):
1
2
#!/bin/sh
swapon /tmp/mnt/sda1/myswap.swp
Now every time the router reboots, it will turn on swap.

Using a swap partition

This method is not recommended if using USB storage with multiple partitions.
  1. Using your computer, create a linux-swap partition on your disk that will be mounted on the router. You can use GParted for linux, MiniTool Partition Wizard Home Edition for Windows or Disk Utility for MacOS;
  2. Connect the formatted drive to router and in PuTTY terminal use command fdisk -l to see how it was mounted. Let’s asume it is mounted as sda1;
  3. Again in PuTTY terminal use command swapon /dev/sda1 and then free to see if swap is correctly activated;
  4. If swap is correctly activated, use the script /jffs/scripts/post-mount with the command swapon /dev/sda1 as mentioned above.
1
2
#!/bin/sh
swapon /dev/sda1

Warning!

Do not use SWAP (partition or file) on a device which goes to hibernation or does spin-down. You might make the router more unstable than without using SWAP.
Be sure you deactivate spin-down on the device which you want to use for SWAP.
Spin-down settings on ASUS router powered by Asuswrt-Merlin
There are some devices, like the Western Digital USB HDDs WD Elements, My Book or My Passport which have their own power management and will not be affected by the settings on the router and they will spin-down if data is not read or written for some time. I recommend to avoid this kind of devices for SWAP.
Info source:
http://www.dd-wrt.com/wiki/index.php/Linux_SWAP

Monday, May 13, 2019

转:论文写作利器 LaTex 系列之推荐套装

From: http://www.huangpan.net/?p=1756

软件安装和配置

依次安装如下软件并进行配置,其中

TeX Live(必装)

TeX Live 是由国际 TeX 用户组织 TUG 开发的 TeX 系统,支持不同的操作系统平台。这也是本方案的核心,配置所有的编译环境和各种宏包,还附带了一个编辑器(不是很好用)。

下载

由于 TeX Live 2019 常规安装需要一边下载一边安装,速度较慢,所以博主推荐直接下载 ISO 文件,可一次性获取完整的安装文件,可以使安装过程更为顺畅。放上清华大学的镜像,点击链接下载。

安装

  1. 下载的文件是 ISO 光盘镜像文件,用虚拟光驱挂载或者直接用解压工具打开即可。
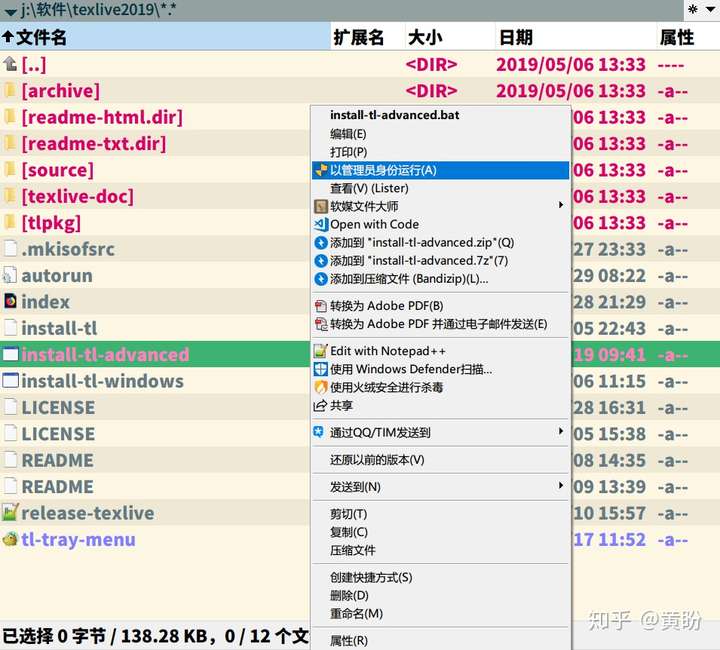
  2. 在解压出来的主目录中找到 install-tl-advanced.bat 文件,右击并以管理员身份运行注意:文件夹路径里面不能有中文,不然打不开。


  1. 选择安装目录。注意:安装后将会占用5G左右的磁盘空间,建议将安装目录切换到D盘或者其他空间较大的盘中。
  2. 其他默认即可。

VSCode(必装)

VSCode 全称 Visual Studio Code,是微软出的一款轻量级代码编辑器,免费、开源而且功能强大。它支持几乎所有主流的程序语言的语法高亮、智能代码补全、自定义热键、括号匹配、代码片段、代码对比 Diff、GIT 等特性,支持插件扩展,并针对网页开发和云端应用开发做了优化。软件跨平台支持 Win、Mac 以及 Linux。 更多关于 VSCode 的介绍,请点击链接查看本站文章。

下载

下载链接

安装

查看本站安装教程

LaTex Workshop(必装)

LaTex Workshop 是 VSCode 的插件,这个插件为 VS Code 提供了 LaTeX 语言支持。

下载安装

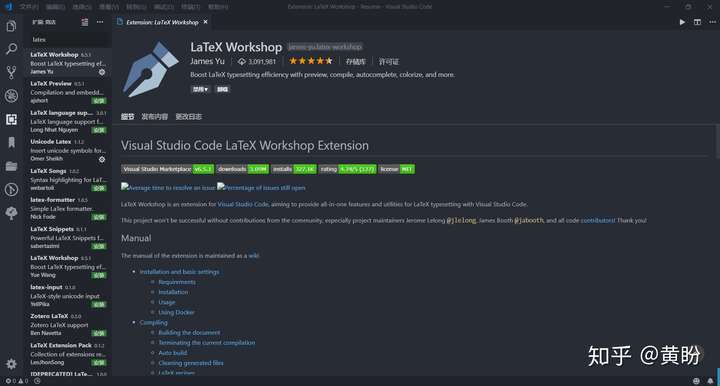
在 VSCode 的扩展管理中,搜索 latex,第一个结果就是我们要安装的插件。


基本配置

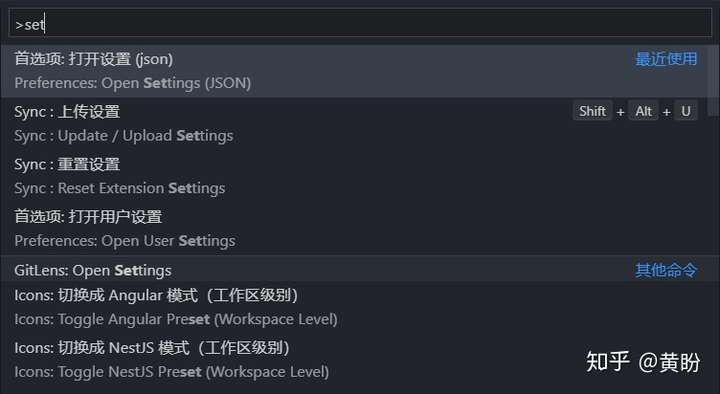
在 VSCode 里面按住快捷键,CTRL+SHIFT+P,然后输入 set,用 ENTER 选择第一个。

然后将下面的代码复制粘贴到你的 setting.json 文件最外面移对花括号里。
"latex-workshop.latex.recipes": [{
        "name": "xelatex",
        "tools": [
            "xelatex"
        ]
    },
    {
        "name": "xelatex ->bibtex -> xelatex*2",
        "tools": [
            "xelatex",
            "bibtex",
            "xelatex",
            "xelatex"
        ]
    },
    {
        "name": "pdflatex",
        "tools": [
            "pdflatex"
        ]
    }
],
"latex-workshop.latex.tools": [{
        "name": "xelatex",
        "command": "xelatex",
        "args": [
            "-synctex=1",
            "-interaction=nonstopmode",
            "-file-line-error",
            "%DOC%"
        ]
    },
    {
        "name": "pdflatex",
        "command": "pdflatex",
        "args": [
            "-synctex=1",
            "-interaction=nonstopmode",
            "-file-line-error",
            "%DOC%"
        ]
    },
    {
        "name": "bibtex",
        "command": "bibtex",
        "args": [
            "%DOCFILE%"
        ]
    }
],
现在就可以用 VSCode 编辑 LaTex 文档并编译出 PDF 文件了,按 CTRL+ALT+B 编译,然后按 CTRL+ALT+V 打开 PDF 文件。

还有一些小细节

为了使用过程更舒服,博主还建议修改两个参数:
"latex-workshop.latex.autoClean.run": "onBuilt",
"latex-workshop.latex.autoBuild.run": "never",
]
由于 LaTex 编译过程会产生一些辅助文件,放在那没什么用,看着也糟心,所以第一个参数是指定在PDF文件生成后自动清除辅助文件。第二个参数是指保存是否自动编译 LaTex 文件,因为 VSCode 有自动保存功能,所以每次自动保存都会编译 LaTex 文件,这样就会导致电脑每隔一段时间就会自动编译文档,没有必要。

Sumatra PDF(推荐)

Sumatra Pdf 是一款轻量级的 PDF 阅读器,类型为开放软件,并且有安装版和便携版两个版本。 VSCode 内置的 PDF 查看器功能比较简单,而且不太方便,而 Adobe Reader 则相对体积大,打开速度慢。Sumatra PDF 小巧强大,启动速度快,作为本方案的 PDF 阅读器最合适不过,而且还可以和源码之间实现定位跳转,弥补 LaTex “所见非所得”的劣势。

下载安装

基本配置

要使用 Sumatra PDF 预览编译好的PDF文件,将下列代码复制粘贴至 setting.json 配置文件内。
"latex-workshop.view.pdf.viewer": "external",
"latex-workshop.view.pdf.external.command": {
    "command": "C:/Programs/SumatraPDF/SumatraPDF.exe",  //SumatraPDF.exe的实际路径
    "args": [
        "%PDF%"
    ]
},

配置正向搜索(LaTex->PDF)

"latex-workshop.view.pdf.external.synctex": {
    "command": "C:/Programs/SumatraPDF/SumatraPDF.exe",  //SumatraPDF.exe的实际路径
    "args": [
        "-forward-search",
        "%TEX%",
        "%LINE%",
        "%PDF%"
    ]
},
右键文件空白处,单击 SyncTeX from cursor 或者 CTRl+-> 即可正向搜索。

配置反向搜索(PDF->LaTex)

打开 Sumatra PDF,进入设置->选项对话框,在“设置反向搜索命令行”处填入如下内容:
"C:\Program Files\Microsoft VS Code\Code.exe"  -g "%f:%l" %Code.exe的实际路径%
双击 PDF 中的任意一处即可跳转到 VSCode 中所对应的内容的源代码处。注意:由于从 VSCode 调用 Sumatra PDF 时是作为子进程的,为避免反向搜索失败,最好是先独立的运行SumatraPDF.exe后再进行正反向搜索。

Git(推荐)

Git 是用于 Linux 内核开发的版本控制工具。经常写论文的人都知道,一篇论文需要修改很多遍才能满意,这个过程中就有许多论文版本,比如初稿,终稿,最终版,打死也不改最终版等等版本,版本一多,就需要管理了,不然太乱了。有的时候可能觉得最终版就是最后要交的版本了,可老师突然说上一个版本更好一点,可上一个版本你都删了,或者你也不知道上一个版本是哪一个了,这就很尴尬了。所以写论文时,一个好的版本控制工具就尤为重要了。

下载安装

官网下载链接

基本教程

博主准备后面再写一篇关于 Git 的文章,先放上我的入门教程,廖雪峰老师的文章,点击查看

VSCode 插件

VSCode 自带了终端,所以可以直接在终端里用命令进行 Git 操作。不过刚开始可能不习惯,需要一些图形按钮进行辅助,而且这些插件还加强了 Git 的操作,还是很有必要安装的。
  • GitLens
  • Git History

其他配置

latex-formatter

这是一款 VSCode 的 LaTex 代码格式化插件,虽然 LaTex 最终显示效果和源码的排版没关系,但排版美观的 LaTex 源码可以让人更加沉浸在写作中,并且清晰的排版可以让初学者更容易找到源码中的错误。它的效果如下:
\chapter{balabalabala}
    \section{balabalabala}
        \subsection{balabalabala}
            \par balabalabala
        \subsection{balabalabala}
            \par balabalabala
    \section{balabalabala}
        \subsection{balabalabala}
            \par balabalabala
上面的缩进使我们一眼就可以看出他们之间的等级关系。

LaTex 辅助软件

挖一个坑,下篇文章再讲。

验证配置是否成功

新建一个文件夹(文件夹名字和文件夹的路径里面不能有中文),在文件夹里面新建一个 test.tex 文件。依次,文件夹上右键 -> open with Code,将下列代码复制粘贴进 test.tex 中。
%!Tex Program = xelatex
\documentclass{article}
\usepackage{zhfontcfg}
\begin{document}
\title{My \LaTeX{}}
\author{黄盼}
\maketitle
%\today
\par{配置成功。}
\end{document}
先单独启动 Sumatra PDF 阅读器,再按 CTRL+ALT+B,编译完后,再按 CRTL+ALT+V,调用 Sumatra PDF 阅读器查看编译好的 PDF 文件。在 PDF 适当位置双击,即可跳转至 VSCode 中的 LaTex 源码,在源码处,右键,单击 SyncTeX from cursor 即可查看对应 PDF 所对应位置。

Tuesday, April 2, 2019

Raspbian, Thunar, browse network, samba share

Required package:

gvfs-backends, gvfs-common, gvfs-fuse, gvfs and gvfs-smb etc.

Friday, March 29, 2019

Auto Mount an NTFS USB Drive on Raspberry Pi

From: https://techwiztime.com/guide/auto-mount-ntfs-usb-drive-raspberry-pi/

Auto mounting an NTFS USB Hard Drive on a Raspberry Pi isn’t that difficult when you know how. In this guide, I’ll be using Raspbian Stretch Lite through the command line interface, but you could do this via the terminal in Raspbian Stretch desktop as well.
Let’s get started!

Hardware List

Software List

From the Command Line, we need to first make sure Raspbian is completely up to date and install the neccesary package to make NTFS work which is called NTFS-3G. Once that’s done, we will do a quick reboot to make sure everything sticks in place.
sudo apt update
sudo apt upgrade
sudo apt install ntfs-3g -y
reboot

Next we need to create a directory on the Raspberry Pi that will act as the mount point for the USB Hard Drive. To keep it organised, we will create this in the directory mnt and we will call the folder usbhdd to keep it simple.
sudo mkdir /mnt/usbhdd
Now that we have the folder ready, we need to figure out what the hard drive partition is that we want to mount. To do this, we need to check out fdisk and see which partition is the one we want to mount. It should be the last in the long list. This could be sda2, sda1 or even sdb2 so look at the size and whichever is bigger should be the correct one. Mine shows 1.8T as the biggest partion so I know that sda1 is the one that I want.
sudo fdisk -l
Now we know our device partition, we need to get what is know as the Partition ID. This will let us mount the USB Hard Drive even if the device changes from sda1 to say sdb1. It has happened to me before and caused my whole Raspberry Pi to fail at boot up so this step is important. You should see a section called PARTUUID=”000xxxxx-00″ on the device line. My particular one was 770bcbdc-01 and that’s what you would need to write down.
sudo blkid
With our Partition ID, we can now add some information to the FSTAB so our drive will automatically boot each time, but first we want to figure out the ID of our current logged in user. This will be important I promise. It will probably be uid=1000 and gid=1000. We need to take note of both the uid and the gid numbers.
id
FSTAB is our next step. Here we need to add the information we have gathered so far and before we reboot, we are going to test that it worked so we don’t cause the raspberry pi to fail at boot up. So the following string needs to be inserted on a new line under the exisiting ones, replacing the following with your details. PARTUUID, Mount Point, GID and UID.
This opens the FSTAB so we can edit it with the auto mounting information.
sudo nano /etc/fstab
This is the code you need to put into the file. Once you are done, press Control X then Y then ENTER to save the file.
PARTUUID=770bcbdc-01 /mnt/usbhdd ntfs auto,exec,rw,user,dmask=002,fmask=113,uid=1000,gid=1000 0 0
Broken down a little, here’s what that all means
file system - PARTUUID=770bcbdc-01 - This is the partition id for in my case /dev/sda1
mount point - /mnt/usbhdd - This is the folder we created for mounting the USB Hard Drive
type - ntfs - This is the format the hard drive is in. It could be HFS+ for Apple, EXT4 for Linux of FAT32 for DOS
options - auto,exec,rw,user,dmask=002,fmask=113,uid=1000,gid=1000 - Long Story short, this gives all the permissions
dump - 0 - This means we don't want to create a dump
pass - 0 - This means we don't want to do a file system check everytime

With the file now saved, we need to check that there’s no errors in the file before we reboot. To do that, we need to try and mount the partition from the FSTAB file.
sudo mount -a
If no errors come up, then we can check that the device is mounted correctly
sudo df -h
If you see your device in the list, then we are safe to do a reboot of the Raspberry Pi.
reboot
Once we are rebooted, log in to the raspberry pi and check you USB Hard Drive has mounted by going to that folder.
cd /mnt/usbhdd
And then we can check what’s in the folder by listing it’s contents
ls -la
And that’s it ladies and gentlemen. You should now have your Raspberry Pi setup to auto mount an NTFS formatted USB Hard Drive every time it reboots. Leave a comment down below if you have a problem and someone here or in the community should be able to help.

Monday, January 28, 2019

Linux Mint, Touchpad Sensitivity

From: https://forums.linuxmint.com/viewtopic.php?t=145283

The property "Synaptics Finger" can affect the touchpad sensitivity. If you look at your values:
Synaptics Finger (278): 12, 15, 128

The 278 is the id # of the property and the three numbers after it are the values for FingerLow, FingerHigh, and FingerPress. 
You can read about these properties in the link below:
http://www.x.org/archive/X11R7.5/doc/man/man4/synaptics.4.html

FingerHigh must always be higher than FingerLow. Start by increasing the values of FingerLow and FingerHigh two points at a 
time with this command:
xinput --set-prop "AlpsPS/2 ALPS DualPoint TouchPad" 278 14 17 128

Sometimes using the name of the touchpad doesn't work in the command, so the id # number you previously obtained must be used, 
substituting it for the X below:
xinput --set-prop X 278 14 17 128

The command should go into effect immediately, so you can test the touchpad.
Then try: xinput --set-prop X 278 16 19 128
and continue increasing the values of FingerLow and FingerHigh until the problem is resolved, but once you get to around 35 to 40, then 
going any highter probably won't help. For a Synaptics touchpad you may be able to go higher. If you go too high then some other
function of the toughpad may not work. Any changes made will only last for one session but right now we're just trying to see if this method
works.


To make the changes permanent, first open the file "50-synaptics.conf" with this command in the Terminal: 
gksudo gedit /usr/share/X11/xorg.conf.d/50-synaptics.conf
* file name may changes

Add the following two lines to the first section named: Section "InputClass" 
Replace the "Y" and "Z" in the lines with the values you got from testing:
Option "FingerLow" "Y" 
Option "FingerHigh" "Z" 


Save the file.

Thursday, July 19, 2018

OpenVPN on linux (PIA)

From: https://www.privateinternetaccess.com/archive/forum/discussion/18003/openvpn-step-by-step-setups-for-various-debian-based-linux-oss-with-videos-ubuntu-mint-debian

Install network-manager-openvpn and its dependencies
=============================================
    sudo apt-get install network-manager-openvpn network-manager network-manager-gnome network-manager-openvpn-gnome
    - then press [enter]

*{For Debian and Kali only}
    Enabling Interface Management
    sudo nano /etc/NetworkManager/NetworkManager.conf
    - then press [enter]
        - edit the line "managed=false" to be...
            "managed=true"
        - Save the file and exit by...
            - Press "Ctrl+x"
            - then press "y"
            - then press the [Enter] key

Reboot the computer now!


* After rebooting the computer continue with the following steps...

   
Make a directory and download the crt and pem files
=============================================
In Terminal - Make a directory to store the setup files
    mkdir ~/OpenVPN-setup-PIA
    - then press [enter]

Move into that directory
    cd ~/OpenVPN-setup-PIA
    - then press [enter]

Download the openvpn.zip from privateinternetaccess.com with...
    wget http://www.privateinternetaccess.com/openvpn/openvpn.zip
    - then press [enter]

Extract the files from the zip with...
    unzip openvpn.zip
    - then press [enter]

You can now exit the terminal with...
    exit
    - then press [enter]
  
Import the PIA OpenVPN config file
=============================================
- Right click the Network Manager on the menu bar
    - and click "Edit Connections..."
    - then click "Add"
    - choose "Import a saved VPN configuration..." for the connection type from the drop down menu
    - then click "Create..."
    - double click to go into "OpenVPN-setup-PIA" folder
    - choose which server you would like to setup and connect to
    - then click "Open"
    - Remove only the ":1198" from the "Gateway:" ( if present ) as only the domain name should be in this box
    - for the "User name:" type in your "p1234567" username
    - for the "Password:" type in the password that goes with your "p-xxxxx" username
    - Then click "Advanced..."
    - Check "Use custom gateway port:" and set it to "1198"
    - Click on the "Security" tab
    - Set the "Cipher:" to "AES-128-CBC"
    - Set the "HMAC Authentication:" to "SHA-1"
    - Click "OK"
    - Click "Save"
Reboot the computer now! (optional but recommended )

Now connect to the VPN
=============================================
- Now Left click the Network Manager on the menu bar
    - click "VPN Connections"
    - click Ex. "Mexico" {This will be the name of the server you chose to setup}
    - wait for it to connect
  
- Test by opening your Internet browser and going to...
    https://www.privateinternetaccess.com/pages/whats-my-ip/
    https://ipleak.net/
  
Enjoy!